GitHub is a free service that lets you share files between multiple computers across a network by storing a common copy in a Git repository. After you've signed up with GitHub and configured your local machine(s), you can configure JMRI to use it to share Rosters, layout configuration files and other information between multiple computers.
Note: If you're not familiar with Git and GitHub, you might be better off using Dropbox to share files between computers. Git and GitHub are a full-featured software version control system, which makes them more complex than the almost-automatic nature of Dropbox. Git and Github will let you control when changes are stored, have multiple versions on branches, and in general manage your JMRI configurations very closely; but if you just want share files, Dropbox may be easier.
Using Git has some advantages:
Next we're going to put an existing JMRI user files location up onto GitHub for sharing. (These instructions assume that the associated JMRI profile is also in that user files location.) If you don't have that set up yet in JMRI, please create a profile, set the preferences, etc.
Next, locate the JMRI user files location directory for that profile on your computer's file system.
To do that, go to
Help->File Locations and press [Open User Files Location].
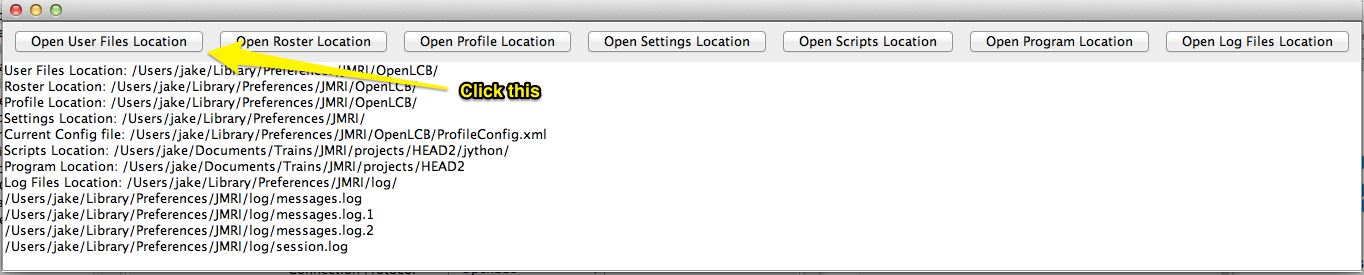
This will open a window on your desktop showing that directory.
On your command line, change directory to that location. (How you do this depends on what kind of computer you have)
Execute the following git commands:
            git init
            git add .
            git commit -m"initial contents"
This will turn the directory into a git repository
and commit your current contents into it.
Now we move to GitHub and create a corresponding repository there. To do that
https://github.com/myaccountname/myreponame.git
git remote add origin https://github.com/myaccountname/myreponame.git
where the URL is the one you copied from GitHub.
        git branch -M main
        git push --set-upstream origin main
(The -u origin option is a one-time thing to associate the
repository on your computer with the one on GitHub.)
At this point, you have a working setup. When you make changes in your
profile directory, you can record them in git with the usual
"git commit"
command, and move them to and from github with
"git push" and
"git pull"
as usual.
Finally, open JMRI, go to the Load and store pane in the Preferences, and select the checkboxes to exclude dynamic content. This omits various time and version information from the XML files that JMRI writes, which will reduce un-necessary merge conflicts as you work with those XML files. Commit this change and "git push" it to GitHub.
The only steps you need to do on subsequent computers are:
First, copy the entire profile directory from one of your computers to the USB stick. This will be a master that you're moving around. (You can also directly 'git clone' onto the USB stick.)
Then, from your computer's JMRI preferences Git directory, you can bring the USB stick up to date with your directory with
            git commit -m"really lucid comment" .
            git push /path/to/USB/directory
Similarly, you can get the contents from the USB stick with
git pull /path/to/USB/directory