OpenLCB: RR-CirKits Tower LCC+Q STL Editor
The Tower LCC+Q node from RR-CirKits has the same I/O capabilities as the original Tower LCC. The logic Conditionals have been replaced by a subset of the PLC (programmable logic controller) language from Siemens. The Siemens statement line language (STL) is a high performance language with a small memory requirement.
Here is the logic to set the aspect for a single head mast.
CLR // Right B
= Q0.0
= Q0.1
= Q0.2
O I0.4
O I0.5
O I1.1
= Q0.2
JC E1
A Y0.0
= Q0.1
JC E1
= Q0.0
E1: CLR // Right C
etc.
The STL logic is based on item states instead of item change events. LCC events are collected in the input table (I) variables. The logic is processed every 20 ms with the true/false results set in the output table (Q) variables. At the end of the cycle, the LCC events for changed output variables are sent to the LCC network.
The STL Editor consists of a LCC node selector, five data tabs, a number of toolbar buttons and File and View menus. The basic mode is to select a LCC node which loads the logic data. The node selector only shows Tower LCC+Q nodes. When changes have been made, they can be stored using the Store button.
Offline work is supported by exporting and importing the content using a CSV file set. This is a set of five files stored in a selected directory in the user files location. Each Tower LCC+Q node will need its own directory.
The online and offline modes can be used together. For example, select the node which loads the data. After making changes, export to CSV for a backup. Then do a store and compile. Later some offline changes are made and exported. To get them back to the node, select the node which loads the old data. Do the import to overwrite the old data and then do the store and compile.
The STL Editor has been added to the OpenLCB/LCC menu.
Node Selector
The node selector lists the available Tower LCC+Q boards. Other LCC nodes are not shown. When a node is selected, the logic content will be loaded. If this is the first time the node has been selected during the PanelPro session, the load takes a long time. A dialog is shown while the load process is working.
When the load finishes, the dialog will close. If the node had been previously loaded, such as doing CDI configuration, the load is very fast and the dialog is not shown.
Parsing errors can occur during the CDI loading process. See Parse Errors for details.
STL Editor
The STL Editor provides an alternative method for editing the STL code. It translates the code into a table that has 4 columns. The Label column has the jump labels. These are one to four character words and a colon (:). The Operator column contains a drop down with all of the PLC operators. The Name column contains names. This will have the user friendly name if one was defined in the IQYZ (input, output, receiver, transmitter) tables. Other "names" include labels for jump operators, timer definitions, Mn.n memory variables, etc. The Comment column is for comments. Note: Comments take up a lot of room.
The friendly names assigned to the IQYZ tables would normally be the JMRI user names. There are some limitations. The names in the IQ tables have to be unique. This also applies to the names in YZ tables. For example, a JMRI sensor button with the user name "Turnout 1" (I table) is used to set a JMRI turnout also with the user name "Turnout 1" (Q table). A possible solution is to use "T-Turnout 1" as the Q table name. For signal mast aspects in the Q table, using a colon between the mast name and the aspect works nicely. For example, mastname:Clear.
Note: The friendly names are only used for documentation in the CDI and by the STL Editor to map names to the IQYZ table entries. There is no direct relationship to the actual JMRI table names.
There are few reserved names in STL. One of them is the timer variable. This is the letter T followed by a number from 0 to 63. Using this as a IQYZ name or in a comment will cause issues. For example, don't create a comment such as "Set T1 closed".
since 5.9.6A friendly name from the IQYZ tables can be copied using a shift-click on a table row. Hold the shift key and then click on a table row. The name field in the logic table will be added/replaced. Make sure the correct logic row has been selected before doing the copy from a table row.
The program code is stored in the node. There are 16 logic groups. Each group has a 255 byte space. The percent button is used to calculate the current space utilization.
The Label data is validated to make sure that it has the proper format.
Logic Inputs (I)
The Logic Inputs table has 128 entries. They are numbered from 0.0 to 15.7 (16x8). If names have been assigned to the rows, then the editor will translate between the In.n variable name and the user friendly name. Each row has two event ids. The first one is the event that the logic treats as true and the second for the event that is treated as false. The user has to decide what is true and what is false. In the image, thrown turnouts and active sensors are true. From a logic point of view, think of "is it thrown?" and "is it occupied?".
The event id format is validated for the IQYZ tables. Note: Dialog removed as of JMRI 5.11.4
Logic Outputs (Q)
The Logic Output table has 128 entries. They are numbered from 0.0 to 15.7 (16x8). If names have been assigned to the rows, then the editor will translate between the Qn.n variable name and the user friendly name. Each row has two event ids. The first one is the event that the will be sent when the variable has changed to true and the second for the event that will be sent when the variable has changed to false. The output events are only sent when the variable state changes between true and false.
In this image, the output events are signal aspects. The aspect will be sent when the variable changes to true. The sample PLC code at the beginning of this page shows 3 aspects being set to false. The subsequent logic will set one of them true. The net result is that at most one aspect will change from true to false and one will change from false to true. Most of the time, one variable will be set to false and then back to true. Only an occupancy change, turnout change or destination mast change (link speed) will result in two variables changing. The aspect false events use a zeros event with the aspect id in the last two bytes.
Track Receivers (Y)
The Track Receivers table has 16 entries. The Signal LCC Rule to Aspect has a Link Address for each mast, such as 02.01.57.10.01.6B.01.80. The link address is a node specific value and cannot be changed. The link address has to be copied and pasted from the Signal LCC.
In the Signal LCC, each mast Rule is assigned a track speed value. The default is Stop (0). These values translate to a number from 0 through 7. This number replaces the last digit of the link address when the aspect changes.
The actual receiver variable names consist of the row number and the speed number, such as Y0.7. That is the "Clear" speed for the first circuit. For the STL Editor, the Yn.n names are converted to the friendly name with a tilde and the speed number, such as SM-Alpha-Beta-1:Circuit~7.
Track Transmitters (Z)
The Track Transmitters table has 16 entries. Each entry will contain the link event id. The link event ids are node specific and cannot be changed.
Each Track Transmitter maps to 8 aspect/speed settings. These are 0 through 7. This results in Zn.n variable names. To represent this as a user friendly name, the STL editor name is name~n. The tilde character is the separator between the row name and the aspect/speed number.
Event Namessince 5.11.4
- The True and False columns for the Input (I) and Output (Q) tables and the Event ID column for the Receiver (Y) and Transmitter (Z) tables
-
When an event name is available, the name will displayed instead of the event id.
When updating an event column row, the event id or the event name can be used if one is available. If an event id is entered and it has an event name, the event name will be displayed. A dialog is displayed when an invalid event id or a bad event name is entered.
The STL Editor does not support assigning a name to an event. Other LCC tools provide this capability.
- Loading a CDI backup file
-
Older CDI backup files can have an event name instead of an event id. The load process will use the event name to find the current event id. If the event name no longer exists in the "name store", a temporary event id will be created. The format of the event id is 00.00.00.00.00.AA.BB.CC. AA will be hex value of the table type. These are IQYZ. The BB and CC hex values will the table group and items. The I and Q tables have 16 (0-15) groups and 8 (0-7) items per group. The Y and Z tables have 16 (0-15) rows and a single item that is always zero. A dialog will be displayed when a temporary event id is created.
Tool Bar Buttons
File Buttons
- Load Backup
-
The Load Backup button extracts the STL data from a CDI backup file.
Parsing errors can occur during the CDI backup loading process. See Parse Errors for details.
- Import
-
Import a CSV file set from a directory in the user files location. If the current data has changed, a warning dialog will request confirmation to revert the data.
Select the directory and click on Select. Double clicking on the folder opens folder instead of selecting it.
- Export
-
Export a CSV file set to a directory in the user files location.
Select the directory and click on Save. Double clicking on the folder opens folder instead of selecting it.
If a new folder is created, it is necessary to back up one level and re-select the new folder.
- Refresh
-
Reload the current data from the current node. If the current data has changed, a warning dialog will request confirmation to revert the data.
Parsing errors can occur during the refresh process. See Parse Errors for details.
- Store
-
Update the data on the current node. The current editor table content is converted to the PLC format using an encoding process. If the resulting PLC code is greater than 255 bytes, the encoding error dialog is shown (See the percent button).
since 5.9.1The content will be store based on the selected store mode in the View menu. The default is Store as readable lines.
Only changed data is stored. The store completion dialog will be displayed when done.
If there are changes that require compiling the STL logic, another dialog will be displayed.
If Use the CDI Configuration dialog to do the reboot is selected, use Configure Nodes ⇒ Open Configuration dialog to reboot the node. The reboot invokes the PLC compiler. The Syntax Messsage segment has to be checked for compile errors. Click on the Refresh button for Message 1. If it shows "Success, no syntax errors found" then the compile was good. If it has an error, also check the other messages.
If Have the STL Editor do the reboot is selected, the node will be rebooted. When the reboot and compile finish, the first syntax message will be displayed. Here is a good result.
Here is a result with an error.
If it shows "Success, no syntax errors found" then the compile was good. If it has an error, also check the other messages using the CDI configuration dialog.
The Import, Refresh, node selection and backup imports check for unsaved changes. A confirmation dialog is displayed if necessary.
Editor Buttons
- Add
Add a blank row to the end of the list.
- Insert
Add a blank row above the selected row.
- Move Up
Move the selected row up.
- Move Down
Move the selected row down.
- Delete
Delete the selected row.
- Percent
Do the PLC encode process and calculate the utilization. The calculation will be based on the selected store mode in the View menu. If the resulting code is more that 255 bytes, a dialog is displayed. It shows the data that would be truncated during a store.
If the View ⇒ STL Preview menu item is enabled, the preview content will be refreshed.
File Menu
The File menu has menu items that are the same as the tool bar file buttons.
View Menusince 5.9.7
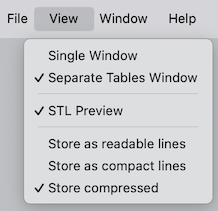
The View menu provides a choice of STL Editor layouts, an option to preview the generated STL logic and three options for storing the STL in the Tower LCC+Q node.
- Single Window
-
The STL Editor tab and the tabs for the IQYZ tables are in the main STL Editor window.
- Separate Tables Window
-
The IQYZ tabs are moved to a second window while the STL Editor tab remains in the main STL Editor window. The tables window cannot be closed while the Separate Tables Window option is selected. The window is hidden when the Single Window option is selected.
- STL Preview
-
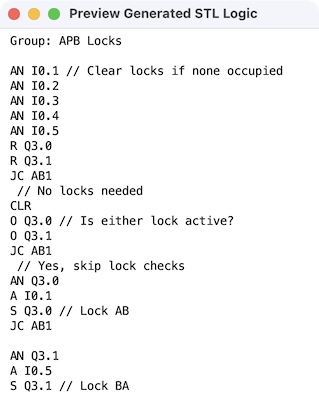
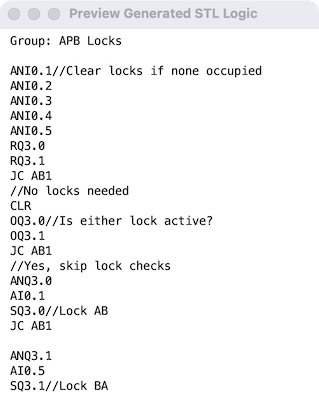
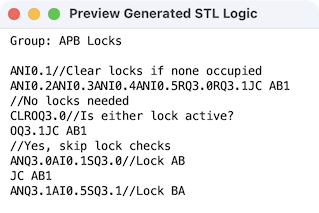
The preview option displays the generated STL logic for the current Group in a separate window. The window cannot be closed but will be hidden when the option is not active. The content is refreshed when the Percent button is pressed or a different group is selected from the Group list. After a Store, it will contain the STL logic for the last group.
Preview examples are shown below.
- Store as readable lines
-
The STL is stored as individual lines and spaces to make the output easier to read.
- Store as compact lines
-
The STL is stored as individual lines without extra spaces.
- Store compressed
-
The STL is stored with only the content. There are natural line breaks after comments and jump labels.
Debugging
Parsing Errors
When CDI content is being loaded into the STL Editor, the content is translated from a series of characters into a logical structure consisting of labels, operators, variables and comments. If the translation fails, the Parsing Errors dialog will be displayed.
The input line can have up to 255 characters. The dialog displays a portion of the line. 20 characters are displayed starting at the indicated number. The item causing the error is in the middle. Any "new line" characters are replaced by the tilde character.
The errors in the dialog are also sent to the JMRI system console. Instead of using a screen shot when requesting help, the text from the system console is easier to read.
ERROR - No operator found at "6", partial text = " I0.0~JCN PT2~~= Q0."
ERROR - No operator found at "26", partial text = "1 // Here PT1 routed"
ERROR - No operator found at "64", partial text = "~JU PTDN~~PT2: SET~A"
ERROR - No operator found at "85", partial text = " I0.1~JCN PT3~~= Q0."
ERROR - No operator found at "105", partial text = "2 // Here PT2 routed"
ERROR - No operator found at "143", partial text = "~JU PTDN~~PT3: SET /"
ERROR - No operator found at "160", partial text = "T // Here PT3 routed"
JMRI Debug Option
JMRI debugging can be enabled using jmri.jmrix.openlcb.swing.stleditor. This can be used to modify the default_lcf.xml file or using PanelPro Debug ⇒ Display / Edit Log Categories. When debugging is enabled, additional information is sent to the JMRI system console.
- Parsing Passes
-
When loading CDI data, the decoding logic processes the input line 7 times to create a token map of the data. This is then used to create the logical view of the data as labels, operators, variables, and comments.
DEBUG - Find label locations
DEBUG - Find variables and operators
DEBUG - Find operators without variables
DEBUG - Find jump operators and destinations
DEBUG - Find timer word locations and load operators
DEBUG - Find timer variable locations and S operators
DEBUG - Find comment locations
If a parsing error is not obvious, knowing which of the 7 passes was active when a parsing error occurred can provide useful context information. Here is an example.
DEBUG - Find timer variable locations and S operators ERROR - No operator found at "6", partial text = " I0.0~JCN PT2~~= Q0." DEBUG - Find comment locations - Decode Line
-
The raw line is displayed. This is followed by the list of tokens created from the line. Here is a short example.
DEBUG - Token = Type: Oper, Name: SET, Start: 0, End: 3 DEBUG - Token = Type: Oper, Name: AN, Start: 4, End: 6 DEBUG - Token = Type: Var, Name: I0.0, Start: 7, End: 11 DEBUG - Token = Type: Oper, Name: JCN, Start: 12, End: 15 DEBUG - Token = Type: Dest, Name: PT2, Start: 16, End: 19 - Encode Line
-
The encoded line is displayed. This will be sent to the Tower LCC+Q when Store is selected. This is the same as the STL Preview window. Here is an example using the Store compressed option:
DEBUG - Encoded multiLine:
 [java] ANI0.1//Clear locks if none occupied
 [java] ANI0.2ANI0.3ANI0.4ANI0.5RQ3.0RQ3.1JC AB1
 [java] CLROQ3.0//Is either lock active?
 [java] OQ3.1JC AB1
 [java] //Lock already in use
 [java] ANQ3.0AI0.1SQ3.0//Lock AB
 [java] JC AB1
 [java] ANQ3.1AI0.5//Lock BA
 [java] SQ3.1
Thanks and congratulations to all who contributed! Contact us via the JMRI users Groups.io group.
Copyright © 1997 - 2024 JMRI Community. JMRI®, DecoderPro®, PanelPro™, DispatcherPro™, OperationsPro™, SignalPro™, SoundPro™, LccPro™, TrainPro™, Logix™, LogixNG™ and associated logos are our trademarks. Additional information on copyright, trademarks and licenses is linked here.
View the


