The Slip Turnout Editor
The slip turnout editor handles turnouts that require more than one accessory (turnout) address and have more than two routes through the turnout.
This includes ..
- Double Slips
- Single Slips
- Three way turnouts
- Scissor or Double Crossings
The way icons are changed in the SlipTurnout Icon Editor is the same as they are changed in the other Icon Editors. The Change Icon...button and the Catalog function identically with other Icon Editors. The Find Icons menu and its items are also identical.
See the Icon Editors page and the Image Index Editor page for details on their use.
Contents of the SlipTurnout Icon Editor
Each type of "Slip" uses a fixed number of turnouts and routes. Typically each "Slip" uses two turnouts and has between three and four different routes.
Each slip must have all the turnouts required added, when all the turnouts are assigned, the Add to Panel button will become active and it can be pressed to install the Slip into the Panel.
To select the type of Slip complex that is being used, use the radio buttons at the top of the window.

Details about how each type of slip should be configured and operate can be found below.
Double Slip
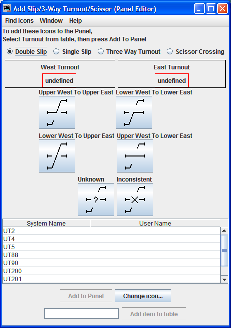
The Double Slip, uses a pair of turnouts to set the four possible routes that are available. Simply drag a row from the Turnout table to place into the corresponding West or East undefined position on the slip. When the turnout is dropped on to the label, it will display the turnout name.
Single Slip
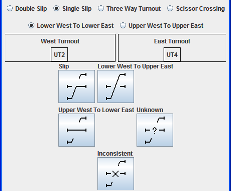
The Single Slip works in very much the same way as the Double Slip in that it requires a pair of turnouts to be selected for the West and East side of the Slip. However it has a further option, which is to select which way the slip routes.

Use the radio button to select if the slip takes the upper or lower route, making the change will automatically change the icon in the slip position to suit.
Three Way Turnout
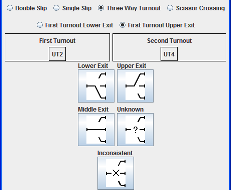
With the Three Way Turnout, you require a pair of turnouts, one for the first throat, then another for the second.

You also need to determine which exit the first throat turnout relates to.
Scissor (Double) Crossing
The Scissor crossing can use either a pair of turnout address with diagonally opposite turnouts being wired together as one. Or it can use four turnout addresses, one for each corner of the scissor.
Note : The Scissor Crossing Icon does not allow for all routes to be set
as crossing, this mainly due to the fact that in many instance setting a scissor crossing to
this state will cause a short circuit. 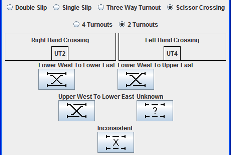
When a pair of turnouts is used, you place the turnout that is controlling the Upper West
to Lower East route into the Right Hand Crossing panel, and the turnout address controlling
the Lower West to Upper East route into the Left Hand Crossing Panel. 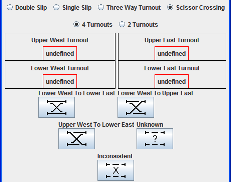
When four turnouts are used, you need to place the four turnouts from the turnout table to the corresponding locations in the panel.
Thanks and congratulations to all who contributed! Contact us via the JMRI users Groups.io group.
Copyright © 1997 - 2024 JMRI Community. JMRI®, DecoderPro®, PanelPro™, DispatcherPro™, OperationsPro™, SignalPro™, SoundPro™, LccPro™, TrainPro™, Logix™, LogixNG™ and associated logos are our trademarks. Additional information on copyright, trademarks and licenses is linked here.
View the