A MultiSensor Icon lets you display one of N icons, depending on which one of N associated sensors is active. For example, you could have three icons displaying the three positions of a CTC lever; see image below. But it doesn't have to be three. For example, you could have ten icons representing the positions of a thumbwheel switch.
The user can move to the next or previous icon by clicking on the icon as described below. This will deactivate the current sensor and activate the newly-selected one.
People often use this in concert with Sensor Groups to make sure that the layout can only activate one sensor.
The way icons are changed in the MultiSensor Icon Editor is the same as they are changed
in the other Icon Editors. The Change Icon...button and the Catalog function
identically with other Icon Editors.
The Find Icons menu and its items are also identical.
See the Icon Editors page and the Image Index Editor page for details on their use.
The icons in the MultiSensor Icon Editor differ only from other Icon Editors in that there are several "active" icons. Each corresponds to e.g. a switch or lever position or some other sequence of icons. On the Panel that's using the icon, the positions can be cycled through in sequence in either forward or reverse order.
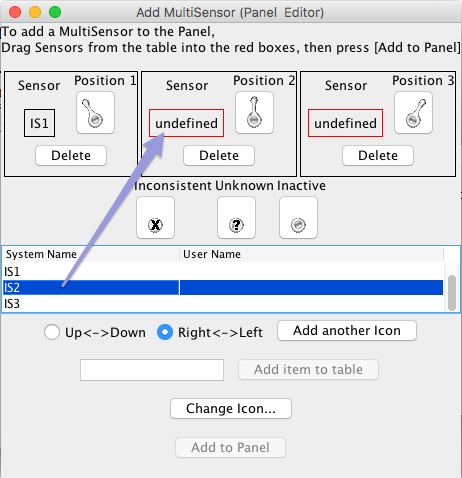
A position can be deleted by pressing the Delete button under the icon. Additional positions can be added by pressing the Add another Icon button.
Each active icon must have a sensor associated with it. To assign a sensor to an icon position, drag a row from the Sensor table to the place in the icon position pane labeled "undefined". When the sensor row is dropped on the label, it will display the sensor name.
The Up <-> Down and Right <-> Left radio buttons determine where the user clicks to go to the next or previous sensor icon. If Up <-> Down is selected, clicking in the top half will advance the selection. If Right <-> Left is selected, clicking in the right half will advance the selection. Note that this works best when all the images are the same size. It can be difficult to properly click on the icons if they vary in size.
When all the active icons are assigned sensors, the Add to Panel button will become active and it can be pressed to install the MultiSensor onto the Panel.