The Virtual Sound Decoder provides a way for those who do not have sound-equipped locomotives (or who are not satisfied with the hardware sound decoder options in smaller scales) to enjoy throttle-controlled locomotive sounds from their computer speakers.
Locomotive sound "Profiles" are stored in a file called a "VSD File". When the Virtual Sound Decoder ("VSDecoder" or "VSD") is launched, the user chooses the desired Profile, and then assigns the VSDecoder an address. When the operator then controls the engine by pressing function buttons or changing the speed, the Virtual Sound Decoder responds just like a hardware sound decoder installed in the locomotive would by playing sounds through the computer speakers.
An example VSD file is included with the package, more examples are available for download on the web and you can make (and share!) your own.
See more details on the VSD File and its Configuration.
Virtual Sound Decoder requires that your system have the OpenAL audio library installed. OpenAL is included by default on the Mac, but must be installed on Windows.
OpenAL is available free from Creative Labs. You can download the installer for your operating system from the OpenAL site.
If you do not have OpenAL installed, Virtual Sound Decoder will seem to work, except you will get no sound output.
Please NOTE: OpenAL is a separate project from JMRI and is neither maintained nor controlled by the JMRI team.
To get started with Virtual Sound Decoder, follow these steps.
Each time you Add Decoder a new control panel will be added to the Manager window. The buttons on the control panel are specific to that VSDecoder.
In the Configure Dialog, you can save a VSDecoder File and Profile selection to a Roster Entry, so that the VSDecoder is automatically loaded when the locomotive is selected from the Roster. Select the Roster entry, load a VSD File, choose a Profile and click "Save to Roster".
For more detailed information on the VSDecoder Manager, see the VSDecoder Manager User's Guide page.
*Support for these systems is expected but not confirmed. If you have one of these systems and can confirm that VSD responds to throttle changes, please mention this on the JMRI users Groups.io group
Notably missing from this list is the popular NCE PowerCab system.
VSD is not compatible with the following systems because they do not send throttle information to JMRI.
The buttons on the Sounds tab can be used to trigger sounds if you are using an incompatible throttle system.
**VSD could also be setup to run in a so called "headless" mode. See more details on this.
With input from locomotive tracking hardware, Virtual Sound Decoder is able to move the apparent source of the locomotive sound to follow the locomotive's position on the layout.
If you have one of the systems noted as "not tested", and would like to help with testing and debug of this feature, please contact me on the JMRI users Groups.io group. More systems will be added in the future.
When you have setup the location following, launch a VSDecoder window, assign a locomotive and run it. As your locomotive moves around the layout, the sound will follow the locomotive's reported position.
Note: The sound will appear to "jump" from location to location as the locomotive's reported location changes. This effect will be smaller with additional and more closely spaced reporters or sensors.
Since JMRI Test Release 4.21.1 the "Location Following" with JMRI Blocks and occupancy
sensors is available.
When you provide a locomotive address as a numeric Block value, then the sound follows the
locations as the locomotive moves from block to block.
For more details, see the Manage VSD Locations
instructions.
If you do not have a hardware tracking system, you can use the JMRI Operations feature to enable a rudimentary form of location following.
To set the Operations locations:
To use Operations for location following, assign the specific locomotive to the train, then select the train in the locomotive's VSDecoder Options pane. When you MOVE the train in Operations, the sound will move to the next location on the Route.
For more information on Operations, see the JMRI® Operating User's Guide.
Since JMRI Test Release 4.13.2 the "Advanced Location Following" is available. The Advanced Location Following calculates the position of a locomotive within a location and sets the sound position continuously. This lets the sound following the locomotive smoothly without a "jump".
For details on setting up Advanced Location Following, see the Manage VSD Locations instructions.
Load the Sound Profiles from a VSD File. Profiles loaded will be available to any currently running or newly launched VSDecoder.
Set preferences for VSDecoder operation. See below for details.
The VSDecoder Preferences pane allows the user to change various preferences in how the VSDecoder works.
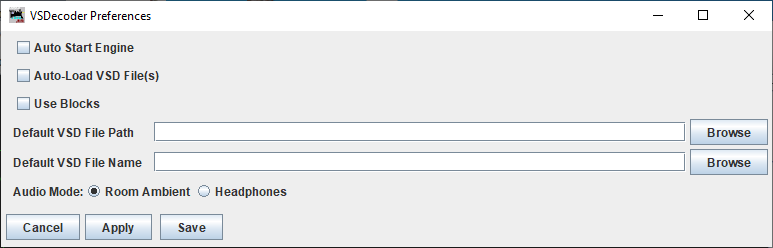
If checked, the Engine sounds will react immediately to Throttle changes, without the Engine Start button first having to be pressed.
Note: Diesel engines normally have a starting-sound. Throttle changes will not be processed until the starting-sound has finished.
If checked, the VSDecoder(s) referenced by a Roster Entry in the Roster Group "VSD" will be automatically loaded on start-up.
To reference a VSDecoder perform the following steps:
Another prerequisite is to add the Action "Start Virtual Sound Decoder Manager" to your JMRI Preferences Start Up.
The number of Roster Entries for Auto-Loading is limited to four.
Note: A change of the Auto-Load mode only becomes effective after a restart of the VSDecoder Manager.
JMRI Throttle Auto-Launch Option:
In addition to or independent to the Auto-Load option for a VSDecoder, you can configure a
Roster Entry to launch a JMRI Throttle automatically.
Therefore the attribute "VSDecoder_LaunchThrottle" must be set to "yes" in the Roster Entry
Media.
If the attribute does not yet exist, it will be saved with the value "no" when you click on
"Save to Roster".
The attribute can be changed manually or by a Jython script (see here).
If unchecked, Blocks are ignored. This may be helpful on Advanced Location Following in Simulator Mode. Default: checked.
This path is the default path for the "Load VSD File" chooser box.
Was required for the first version of Auto-Load. Is no longer used.
Choose Cancel to cancel changes to the Preferences
Choose Apply to apply changes to the Preferences
Choose Save to save changes to the Preferences