Set up the loco to be measured on a running stand with the reader unit appropriate to the track gauge, connected to the MTS-DCC which is connected, in turn, to the PC.
Connect the track on which the running stand is installed to your DCC system.
Add both the DCC system and the reader interface as layout connections in the JMRI preferences. Open the Speedo console from the Speedo menu on the main screen of DecoderPro or PanelPro.
The left side of the window is used for setup and to display the current speed:
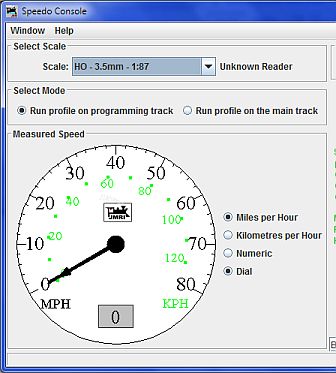
Select Scale: The reader type will be detected when the loco is driven and speed data is received from the reader. Use the Scale drop-down to select the appropriate locomotive scale in order to get the correct speed values.
Select Mode: If you have a DCC system that can run locomotives on the programming track (such as the SPROG) then select "Run profile on programming track" as this will allow reading the locomotive address, etc. without moving between the programming track and a running track. If you can't run locomotives on your programming track, then select "Run profile on the main track".
Measured Speed: The radio buttons to the right of the dial allow the primary (black) speed digits to display the scale speed in either Miles-per-Hour (MPH) or Kilometers-per-Hour (KPH) units. The secondary (green) digits display will show the other units. The speed is displayed digitally in the primary units in the small window at the bottom of the dial. The units on the speed profile graph also change to match. If the measured speed exceeds the maximum value on the dial, it will automatically re-scale itself to match. This can be reset using the "Reset Graph" button under the speed profile chart.
Selecting the Numeric radio button will change the dial to just a box with the speed numerically displayed.
At this stage you can use a throttle (either part of your DCC hardware or a JMRI throttle) to drive the loco and observe the scale speed.
The right side of the window is used to measure the loco speed profile:
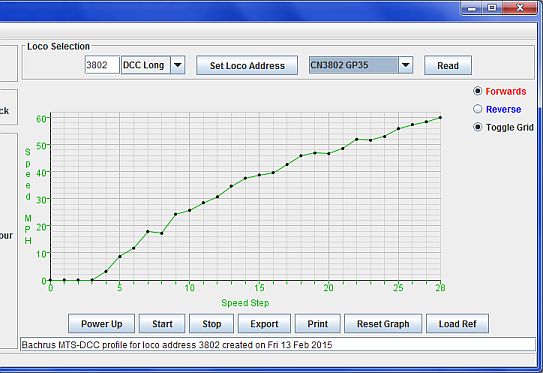
Loco Selection: There are several ways to select the locomotive to profile:
Momentum: This section provides a way to read and set the momentum for your locomotive.
For best results when speed profiling, the momentum CVs should be set to zero so that speed commands take immediate effect. Speed matching will automatically set the locomotive's momentum CVs to 0. For both speed profiling and matching, you should read the locomotive's momentum before starting so that you can restore the momementum CVs afterword.

Speed Profile Chart: The radio buttons to the right of the chart allow you to select whether you want a profile for the locomotive running forward, or backwards, or both. The grid lines on the chart can be toggled off and on as well.
Underneath the chart area are several buttons that control the creation of a speed profile:
Speed Matching: There are two tabs for speed matching behind the Speed Profile tab. The first is for the Basic Speed Matcher. The second is for the Speed Step Scale Speed Matcher.
Both speed matchers will set your locomotive's momentum CVs to 0, so be sure to read the momentum CVs with the Momentum panel before speed matching so you can easily restore them afterword. Both speed matchers also provide configuration for if and how long the locomotive is warmed up and whether reverse is trimmed to match forward. Your locomotive should be warmed up to ensure accurate results. Reverse should also be trimmed for accurate results, but it should be disabled if your decoder doesn't support reverse trim (CV 95) or if it doesn't work with your decoder (NCE decoders have CV 95, but it is not compatible with how this speed matcher sets it).
The Basic Speed Matcher allows you to speed match your locomotive's start and top speed to your desired value with a straight-line speed curve between them. You can use the basic motor control CVs (Vstart [3], Vhigh [4], and Vmid [6]), the speed table (CVs 67-94), or ESU's speed table (a combination of the basic motor control CVs and speed table). When using the basic motor control CVs, Vmid will be speed matched to the speed half way between your desired start and top speeds. When using one of the speed table modes, speed table steps 10 and 19 will be matched to the speeds 1/3 and 2/3 of the way between your desired start and top speeds, respectively.

The Speed Step Scale Speed Matcher allows you to speed match your locomotive such that its speed is equal to the speed step when running in 128 speed step mode. For example, when running at speed step 11 in 128 speed step mode, the locomotive will be going 11 mph or kph depending on what unit the speed matcher was set to. You can use the speed table (CVs 67-94) or ESU's speed table (a combination of the basic motor control CVs and speed table). While this speed matcher is intended to be used with 128 speed step mode, we still only have 28 steps in the speed table, so we can only actually speed match roughly every 4.7 speed steps. The speed matcher first determines the locomotive's top speed. Then it sets the target max speed to either the desired max speed or the next lowest speed table step speed, whichever is lower. The locomotive will then be speed matched so that it plateaus at the target max speed at its corresponding speed step. Every speed table step between and including 1 and the target max speed table step will be speed matched to the corresponding speed. Every speed table step above the target max speed table step will be set to maintain the target max speed.

Note that after these CVs have been set by running the matching, you should go to the DecoderPro roster entry for this decoder and do a "Read Full Sheet" of the corresponding motor control pane to capture the new values.