A Panel is a set of Icons representing various components of a layout. Some of the Icons
available in JMRI include Turnouts, Signals Masts and Sensors. You can include a background
icon to display your layout on your Panel and add the contents of Memory, LogixNG Global
Variables and/or Reporter Variables.
The controls on the Panel itself are described on a separate Panel Help page.
Panels created with the Panel Editor allow you to place images to represent Turnouts, Sensors, Signal Heads, Signal Masts, trackwork, etc.
For clinics showing how each of these things are actually done on the computer screen, please see the JMRI Clinics page.
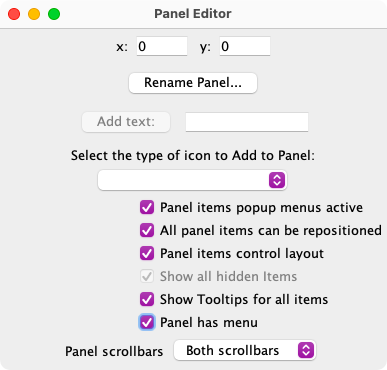
The Panel Editor consists of the following items:
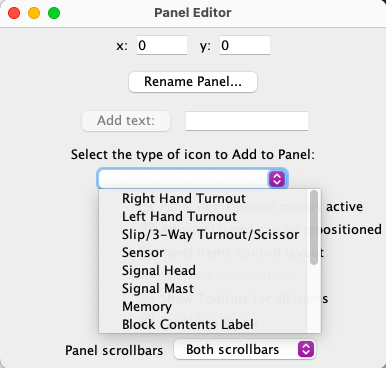
In most cases, selecting one of these items will open a window from which icons or values can be chosen. For the items referring to a JMRI device (e.g. turnout, sensor, etc.) a pick list of the available devices is displayed. From there you select the device and the icon to represent it in the panel. Exceptions to this are the Memory, LogixNG Global Variable and Reporter items where the selection puts the value of item into the panel. The Background item provides images for the background of the panel. Further details on using these windows are described on the Icon Editors page.
The two choices for icons that do not open windows are RPS Reporter and Fast Clock. These items install their icons directly into the panel.
The popup menu may also change if the configuration of an item is changed. For example, if you add feedback to a turnout, the popup menu includes a new item choice called "Tristate". Tristate allows you to use the inconsistent icon, which is one of the four possible icons available for a turnout. Normally when you first click on a turnout icon it commands the layout to change the state of the turnout. If you use feedback for a particular turnout, the icon display will wait to hear from the layout before modifying the turnout icon to the closed or thrown icon. By using Tristate, the icon will change immediately to the inconsistent icon when the turnout is clicked. Inconsistent in this case means that I've commanded the turnout to change and now we're waiting to hear if it actually happened. If and when the layout returns the actual or "known state" of the turnout, the icon will change to that state. If you don't use Tristate, when you click on the icon, it may take some time (milliseconds to seconds depending on the system) before the icon responds with the known state of the turnout.
After getting the panel the way you want, you need to store your changes. since 4.23.3 You can use File ⇒ Store ALL table content and panels... {Old: Store Pamels...} from the PanelEditor menu or you can use File ⇒ Store ALL table content and panels... from the main PanelPro menu. See Loading and Storing Your Work for details.
The JMRI library contains lots of contributed icons for representing CTC panels, LEDs, etc. You can browse through them using the file tree in the Change Icon frame.
Each of the Icon Editor windows has a Find Icons Menu that provides several ways to find and acquire additional icons to place into your panel. See the Icon Editors page for more details.
Because this type of panel is icon-based, you can create panels that look any way you want. For example, instead of using track-schematic icons for turnouts, you could use small images of the levers and plates on CTC machine. This would give you "mechanical" levers you can flip back and forth with a click.
In JMRI it's possible to create a panel where the "track" lines change color to indicate whether the block is occupied by switching to either Control Panel Editor (using Indicator Track icons) or Layout Editor.
To move an icon around on the panel, you "meta-drag" it. On macOS, that's "hold the cmd key and drag with the cursor"; on Linux or Windows, "hold the right mouse click and drag with the cursor".
There's also a pop-up menu (ctrl-click on macOS; right-click on Linux and Windows) that will provide various ways to manipulate the icon. It will let you rotate the icon so that it points in whatever direction you want. Text labels can have their font, size and color changed. You can also remove icons from the panel with the popup menu.
When the checkbox for showing an icon's coordinates is checked, the icon can be scaled or rotated an arbitrary number of degrees. When this checkbox is checked, two additional items appear in the icon's popup menu - Rotate (degrees)... and Scale (percentage).... When these item are selected, a text box will appear near the icon and ask for a number. In the case of 'Rotate (degrees)', a positive or negative integer will rotate the icon that number of degrees. In the case of 'Scale (percentage)', a positive number is the percentage to increase or decrease the size of the icon.
The Rotate (Orthogonal) item rotates the icon 90 degrees each time it is selected. Choosing an alternative rotation item resets the former rotation to the default icon image. For example, if the icon has been scaled to 75% and set to 30 degrees and then 'Rotate (Orthogonal)' is selected, the icon will return to its original size and orientation.
When the checkbox for repositioning icons is checked, groups of icons can be selected. Pressing the mouse button down in an open area and dragging will draw a dotted red rectangle. All the icons that lie within this "fence" are items that are selected. Those icons within the "fence" that do not have the fixed or Lock Position checkbox marked in their popup menus can be moved as a group. Dragging any one of the repositionable icons within the fence will move the entire group. Clicking in an open area will remove the "fence" and ungroup the icons.
In addition, grouped icons can be aligned horizontally and vertically. When grouped, the icons have two additional menu items in their popup menus: Align Vertically and Align Horizontally. Once again, the grouped icons that are not fixed or locked can be aligned with either their left edges (x coordinate) equal, or top edges (y coordinate) equal. These menu items disappear when the icons are ungrouped.
Another feature of grouped icons is they can be locked (fixed) and unlocked (unfixed) as a group when any one of the group's popup menu item for lock or fix is checked.
When placing icons on top of one another, the upper icon may prevent moving the icon underneath. For example when labeling a turnout, you may not be able to reposition the label without dragging the turnout above it. However, if you press the Shift key before dragging the label the turnout will remain in place while you reposition the label. That is a "Shift-Drag" leaves the top icon in place and only moves the icons beneath it.
For users that need to build a classic US&S panel there are several options. The first is to simply select the 15 position panel background from icons/USS/background/uss-15.gif. Another option is to use a pixel based image editor to create your own background image. Save the image as a .gif or similar file. (see info above on where to store new images) Yet another option is to create the background image from multiple slices of the whole panel. JMRI supports using multiple background images so, by simply positioning each image properly, a complete panel of any reasonable size may be created.
Currently there are two sets of image 'slices' available. One set is 718 pixels high, and the second set is 900 pixels high. Choose the set that best fits your display. These 'slices' are located at icons/USS/background/. The 900 pixel high images include a "-9" in their names. The left and right edge images are each 12 pixels wide. The main panel 'slices' are 65 pixels wide. This allows you to precisely position each slice simply by changing the x: and y: coordinates in the Panel Editor. The advantages of building backgrounds with slices are that you can make virtually any length of panel that is required, and the plates will be precisely located automatically.
First set the coordinates to x:0, y:0 and select icons/USS/background/Panel-left.gif. (or icons/USS/background/Panel-left-9.gif) This gives you the left edge of the panel. Change the coordinates to x:12 y:0 and choose the next slice. It may be blank, include a switch plate, include a signal plate, or include both plates. Only the "x:" coordinate needs to be changed as you continue to add additional panel sections. The 'slices' are each 65 pixels wide, so simply add 65 to the x: value for each additional slice. For example; to build up a 15 position panel from slices, use x:0 for the left side, then x:12, x:77, x:142, x:207, x:272, x:337, x:402, x:467, x:532, x:597, x:662, x:727, x:792, x:857, and x:922 for the individual slices. Finally set x:987 and complete the panel with icons/USS/background/Panel-right.gif.
To change the style of any individual slice (e.g. to add a new plate to your panel) first check the "Show item's coordinates in popup menu" check box in the editor window. Next, right click in a blank area of the old slice to raise the pop up information including the coordinates of that slice. Put those numbers in the editor's coordinates, then remove the slice. Finally, choose a new slice and it will appear where the old one was.
PanelPro can communicate with more than one layout hardware system. To configure JMRI® to talk to multiple systems, select them in the Preferences panel (Edit -> Preferences > Connections (tab at left) -> click on the + tab to add the system information for your second System Connection.
If you add a Turnout, Sensor or Signal Mast to a Panel using just a number, e.g. "23" in the Add... pane of a table, its System Name will be created using the System Connection Prefix as set in the Preferences panel -> Connections tab (e.g. LT1 for a turnout on the L LocoNet connection). As a second system connection is required to use a different prefix, it is simple to use more than one hardware system at the same time (for JMRI naming rules see System Names).
Back to the PanelPro help page.