After clicking Add... below the Route table, the following panel appears:
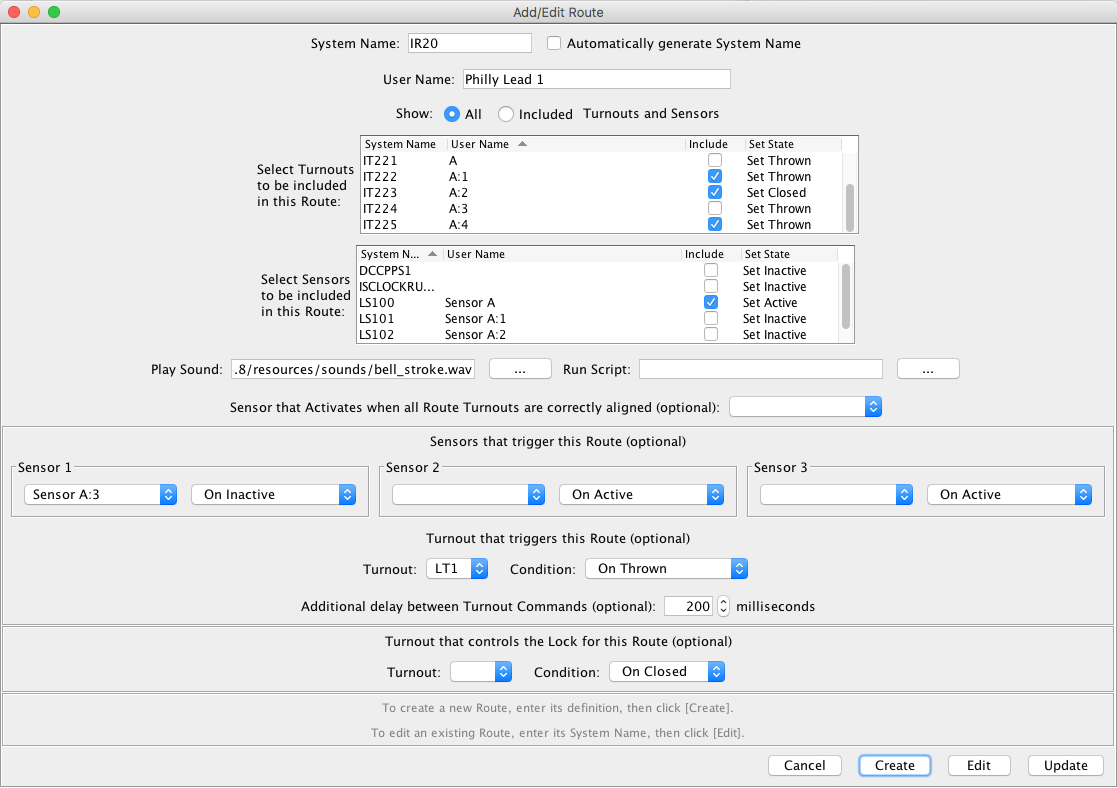
The first thing you must do when creating a route is name it. In the box labeled "System Name" enter a unique name for your Route. If the system name does not start with "IO", "IO" will be prepended to the system name when the Route is created. You can optionally enter a more descriptive name in the "User Name" box.
The radio button below the "User Name" allows you to show only the turnouts or sensors that are part of this route. There are two tables below the "Show:" radio buttons; the first one contains Turnouts and the second contains Sensors. Click the "Include" box in either table to add the desired Turnouts or Sensor to your route. Next to the "Include" box is the action that the included Turnouts or Sensors can perform when the Route is triggered. For example, if you wish the Turnout to be Thrown when the Route is triggered select "Set Thrown" in the drop down box.
Below the Turnout and Sensor tables are three optional features:
Sound files and Scripts are configured by hitting the appropriate "..." button and
selecting the sound file to be played or the script file to be run when the Route is
triggered.
To add a Sensor which will go active when all turnouts are properly aligned, elect the Sensor
from the list. The Sensor will go Active when the Turnouts are correctly aligned for the
Route.
A Route can optionally be triggered by any of up to three sensors. Select them from the three drop down lists and for each select the condition that will trigger the Route. Logic choices are described under Controlling Routes from Sensors.
A Route can be also triggered by a Turnout. Select this Control Turnout from the list and select the turnout Action that will trigger the Route. Logic choices are explained under Controlling Routes from a Turnout.
In some cases, it might be necessary to delay (slow down) the rate JMRI sends commands to change the Turnouts on the layout. By entering a value in the "Added Delay" box, you can increase the amount of time (in milliseconds) between turnout commands when this Route is triggered. By default JMRI inserts a delay of 250 milliseconds (1/4 of a second) between turnout commands.
The next drop down allows you to select a Turnout that will lock this route. When a Route is Locked, all of the Turnouts defined for the Route become Locked.
Once you are satisfied with your Route, use the "Add" button to create the new Route. If you decide that you need to change your Route, use the "Edit" and "Update Route" buttons to modify it.
The Turnout Lock feature allows you to selectively disable accessory (turnout) commands from cabs and/or locally-wired pushbuttons. JMRI disables pushbuttons by sending pushbutton disable commands to the Turnout decoders when the Route is locked, and enables the pushbuttons when the Route is unlocked. When locking a Turnout from cab commands, the JMRI program will monitor the Turnout's accessory address and if it detects a change command from a cab, will cancel the command immediately by sending out the opposite command to the Turnout. All Turnouts that are being monitored by the JMRI program and are included in the Route will be locked.
To help you select a series of Turnouts to lock or unlock, a complete Route can be locked or unlocked. In the "Edit Route" pane, an optional Lock Control Turnout is available as the last drop down. You can use the Lock Control Turnout to enable or disable the Route Lock function from a Panel Turnout icon, a layout turnout or a phantom Turnout. A phantom Turnout is a turnout that can be accessed by your cab but doesn't actually exist on your layout.
For more information on how to set Turnouts to be lockable, see the Turnout Table page.
Back to the Route Table help page.